How to Transform Old Furniture with Chalk Paint: A Beginner's Tutorial
What is Chalk Paint and Why Use It?
Chalk paint is a water-based paint known for its matte, velvety finish and excellent adhesion to surfaces without heavy prep work. It's ideal for furniture makeovers because it requires minimal sanding or priming, making it perfect for beginners wanting to upcycle old pieces quickly and beautifully.
Unlike traditional paints, chalk paint offers durability with a soft, vintage look that enhances the texture of wood or metal furniture. It allows DIY home décor enthusiasts to refresh worn or outdated items easily, promoting sustainable upcycling and giving new life to old furniture.
Essential Supplies and Tools You'll Need
Before diving into your furniture makeover, gather these essential supplies to ensure a smooth chalk painting process:
- Chalk paint: Choose your favorite colors with good coverage and easy application.
- Paintbrushes and rollers: Soft-bristle brushes work best for detail and smooth coverage; small foam rollers speed up flat surfaces.
- Sandpaper or sanding block: To smooth rough patches or distress the paint later.
- Primer (optional): Recommended for glossy or previously varnished furniture but can be skipped for raw wood.
- Wax or sealant finish: Protects the painted surface and enhances durability.
- Cleaning cloths: For prepping the furniture by removing dust and grime.
- Painter's tape and drop cloths: To protect surrounding areas and ensure neat lines.
Having these tools ready will streamline your DIY project and help you achieve professional-looking results on your furniture makeover.
Preparing Your Furniture for Chalk Paint
Proper surface preparation ensures paint adhesion and a long-lasting finish. Start by cleaning your furniture thoroughly with a mild detergent and water to remove dirt, grease, and old residues.
Next, lightly sand the surface with fine-grit sandpaper to smooth imperfections and dull glossy finishes. Sanding is especially important if the piece has a shiny varnish or laminate. This step creates small scratches that help the chalk paint grip better.
If your furniture is particularly worn or has stains, applying a primer can improve coverage and prevent bleed-through. Chalk paint's reputation for minimal prep means you can often skip priming, but it's helpful for tricky surfaces.
Finally, remove dust from sanding with a clean, dry cloth or tack cloth. Clean, dry, and slightly roughened surfaces allow chalk paint to adhere properly and last longer.
Step-by-Step Chalk Painting Process
To transform old furniture using chalk paint, follow these step-by-step instructions:
- Protect your workspace with drop cloths and mask areas with painter's tape to keep clean lines.
- Stir the chalk paint thoroughly for even pigment distribution but avoid shaking to prevent bubbles.
- Apply the first coat using a soft brush or foam roller in smooth, even strokes along the grain or surface direction.
- Let the paint dry fully, usually between 30 minutes to an hour depending on temperature and humidity.
- Add a second coat for full coverage and a richer finish, refining any uneven patches.
- Allow the final coat to dry completely before handling or applying sealants.
Chalk paint dries faster than traditional paints, allowing beginners to work efficiently without long wait times. Using quality paintbrushes helps avoid visible brush strokes and ensures a smooth surface.
Finishing Touches: Sealing and Distressing Techniques
Sealing your chalk painted furniture protects the surface and enhances durability. The best finish options include clear wax, dark wax, or water-based sealants made specifically for chalk paint.
Wax finishes add a soft sheen and deepen color tones. Apply wax with a clean brush or cloth in thin layers, then buff to a smooth finish. Dark wax can give a subtle aged look by settling into crevices.
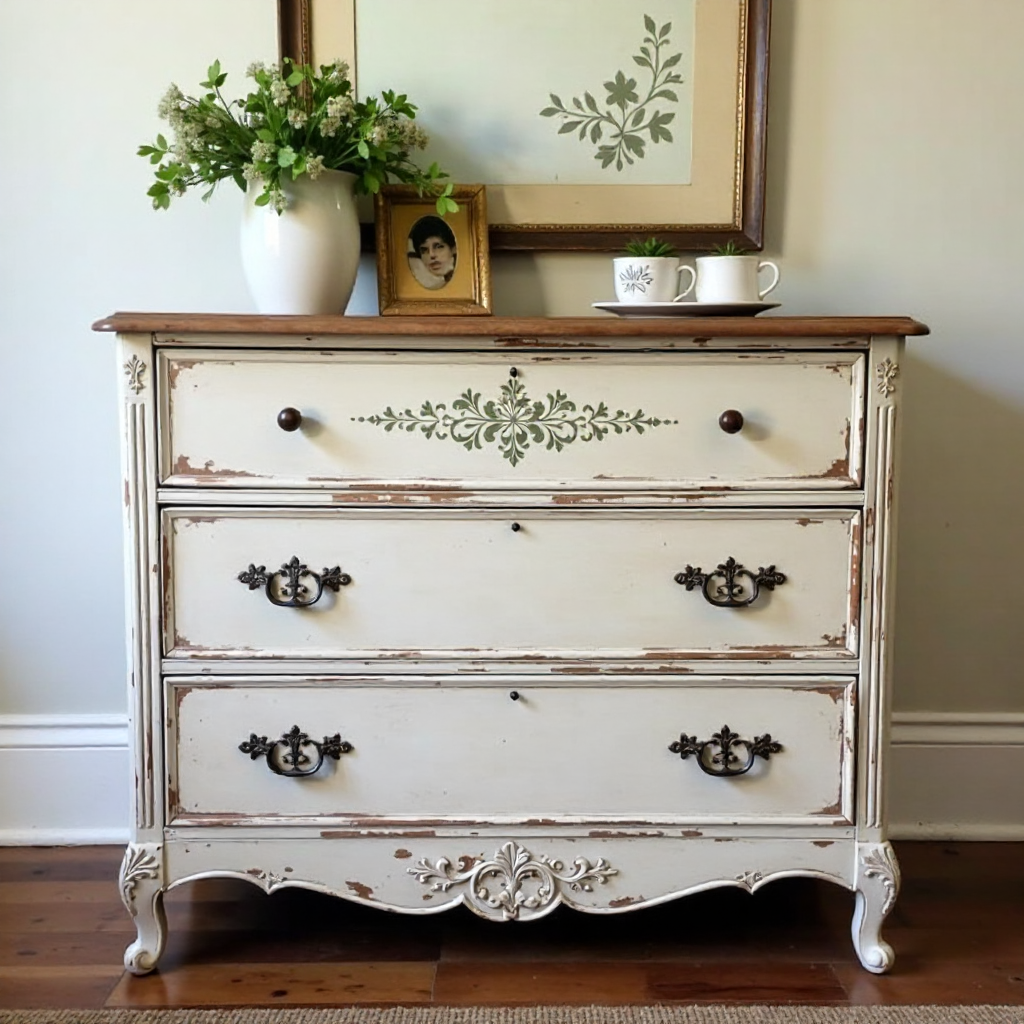
Distressing techniques add character by lightly sanding edges and corners after painting and waxing. Use fine or medium sandpaper to gently reveal underlying wood or paint layers for a vintage, worn appearance.
This combined method of sealing and distressing achieves a beautiful, lived-in look often popular in shabby chic and rustic décor styles, giving your upcycled furniture a professional touch.
Tips and Common Mistakes to Avoid
To get the best results, keep in mind these beginner-friendly tips and avoid frequent pitfalls:
- Don't skip cleaning and light sanding: Neglecting prep can cause paint to peel or look uneven.
- Avoid applying paint too thickly: Thick coats dry poorly and can bubble; thin, multiple coats work better.
- Use proper brushes: Cheap or stiff brushes create rough textures and streaks.
- Patience is key: Allow sufficient drying time between coats and before sealing.
- Don't over-distress: Excessive sanding can expose too much raw wood and reduce protection.
Following these steps helps avoid time-consuming rework and ensures your furniture makeover looks polished and lasts longer.
DIY Inspiration: Ideas to Personalize Your Upcycled Furniture
Once comfortable with foundation chalk painting techniques, personalize your furniture makeover with creative touches:
- Stenciling: Use decorative stencils and contrasting chalk paint colors to add patterns or motifs.
- Color layering: Apply multiple chalk paint colors, sanding between layers for a unique, multi-dimensional effect.
- Hardware upgrade: Swap old knobs and handles for vintage or modern hardware to enhance character.
- Mixed media: Combine chalk paint with decoupage or fabric inserts for one-of-a-kind pieces.
- Functional art: Repurpose painted furniture as statement décor — like painted bookshelves or side tables with artistic flair.
These ideas promote upcycling as a sustainable DIY home décor approach and encourage making old furniture uniquely yours.
FAQ
How long does chalk paint take to dry?
Chalk paint generally dries to the touch within 30-60 minutes but can take up to 24 hours to cure fully depending on thickness, temperature, and humidity.
Can you use chalk paint on all types of furniture?
Chalk paint adheres well to wood, metal, glass, and laminate surfaces, but rough or oily surfaces may need extra prep like sanding or priming for best results.
Do I need to sand before chalk painting?
Light sanding is recommended to smooth rough patches and dull shiny surfaces to help paint stick better. However, chalk paint often requires less sanding than traditional paint.
What is the best sealant for chalk painted furniture?
Wax finishes are popular for their protective and aesthetic qualities. For higher durability, water-based polyurethane sealants compatible with chalk paint are also good choices.
How do I achieve a distressed look with chalk paint?
After painting and sealing, gently sand edges and raised details with fine to medium sandpaper to reveal layers beneath or bare wood, creating a naturally aged appearance.
For more on sustainable upcycling and furniture painting, the chalk paint Wikipedia entry offers additional insights into its history and uses.